Today creating content on digital platforms is a challenge. Regardless of the platform where you upload your material, a key point to like it is found in the quality of your projects.
And no, we are not talking about having the most expensive tools or the latest generation cameras. With just a few tips, you can greatly improve your projects, either photographic or cinematographic.
In this post, we are going to give you tricks, especially lighting, so that you can give an intention to each of your creations, improving the quality and including expression more and more.
What is scene lighting?
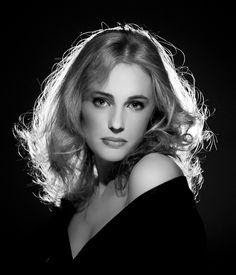
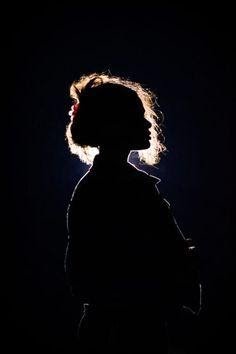
Do you find any difference between these two images?
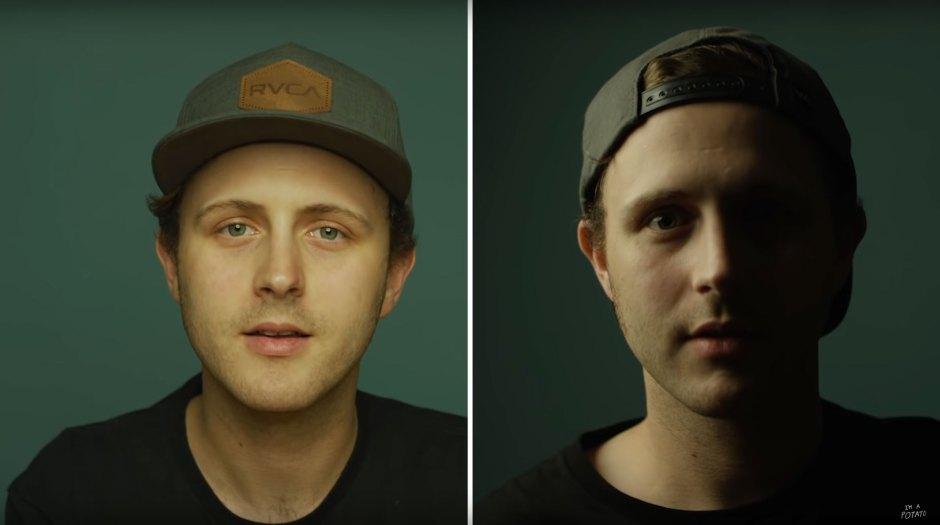
As you can see, everything is exactly the same except for the lighting.
One of the points that most often go unnoticed when you are just beginning to take photos or videos with higher quality, is the lighting. Whatever goal you are looking for in your projects, knowing how to position your lights is very important to achieve the effect you want.
Depending on how you place your light bulbs, you can achieve different results, from changes in the shape of the face to much more striking expressions. Next, we explain each of the concepts that you must take into account when placing your light points.
Basic scene lighting directions
A very important issue that must be known from the beginning is the directionality of light. This concept refers to the way in which the lights are reflected on the object that we want to portray or record. Depending on the direction the light is going, it will create different shadows and patterns on our object.
As such, there are normally three sources of light when lighting the scene, the front, the back and the fill.
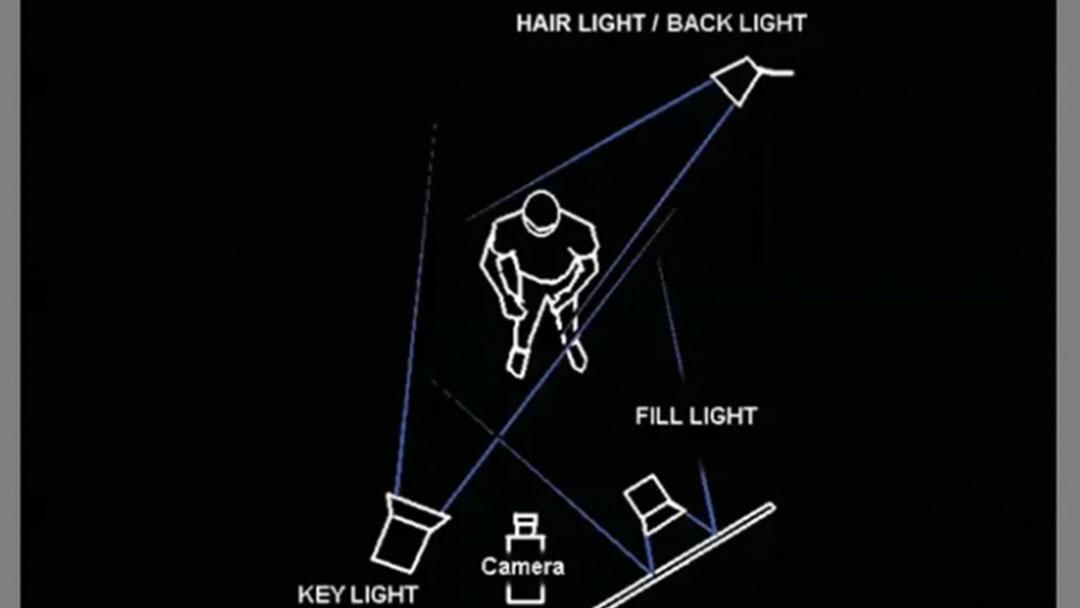
Front light
The key light (also called key light), is going to be a powerful light that is normally positioned in front of what we are going to portray. This is a light that will allow us to produce light shadows on the edges of the object, and, by playing with the position of the focus, we can achieve different shading patterns. In addition, with the key light, we will obtain the “catchlight” effect, which refers to the shape of the light when it bounces off the eyes of the person we are portraying. This effect is perfect to capture the attention of those who observe the photo or video. Here are some examples of shading patterns that are used in the film industry:
- Flat lighting: In this case, the light is directed directly onto the object in question. This allows no shadow to be created and every detail is clear. Dimensionality is lost, and therefore this is the position that will give less drama to your projects. This is a good option for commercials or if you require a detailed image of the object.
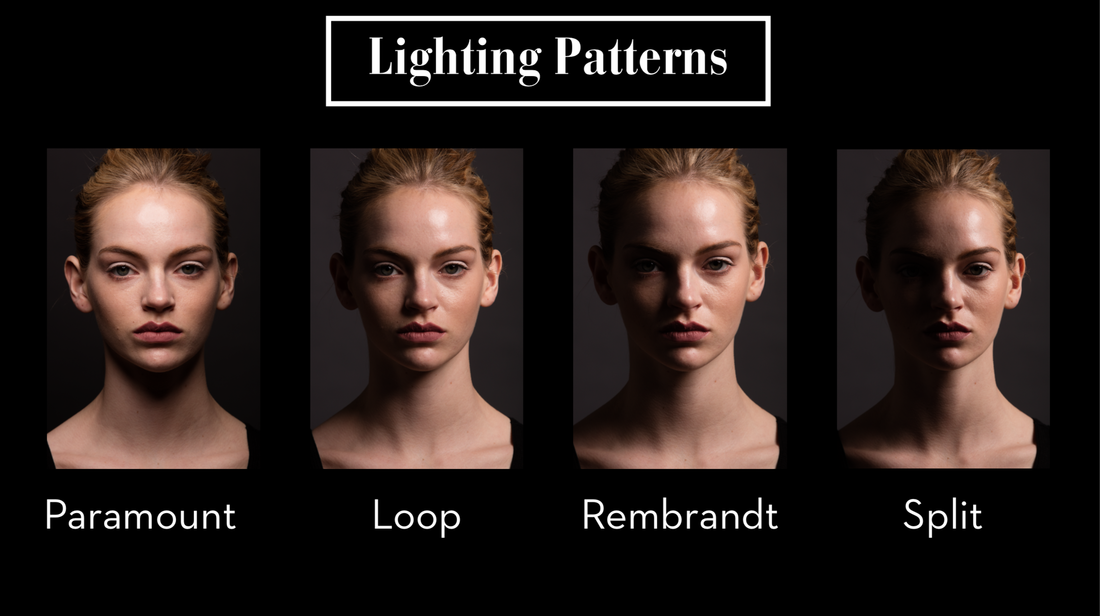
- Paramount lighting: Here, the headlight is not positioned directly in front of the object, but is positioned slightly upwards. With this effect, we will obtain a small shadow under the nose (what is known as a butterfly shadow). This type of shading is used to highlight the features of the face, seeking greater femininity of the face by accentuating the cheeks. It is important that you do not set the light too high, as you could get what is called «raccoon eyes», where the eyes are completely shaded.
- Loop lighting: This effect is achieved by moving the focus that is slightly higher than the object (as in the previous case), towards a diagonal. With this, we create a kind of shadow in the shape of a curve on the nose. This type of lighting is used above all on rounded faces to make them much more elongated, since as you will see, the shading on the faces is much more pronounced, lengthening the shape of the face.
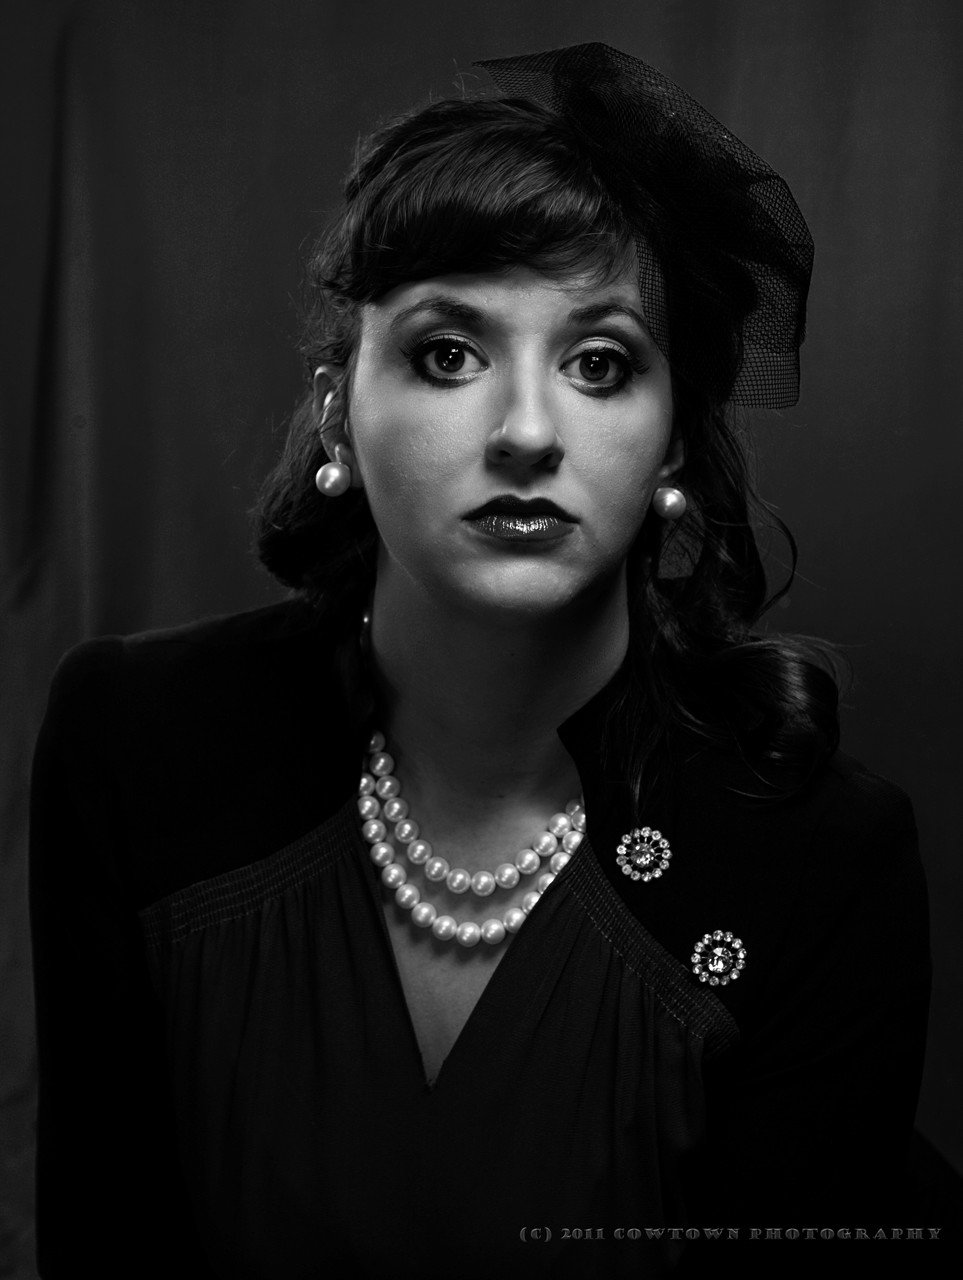
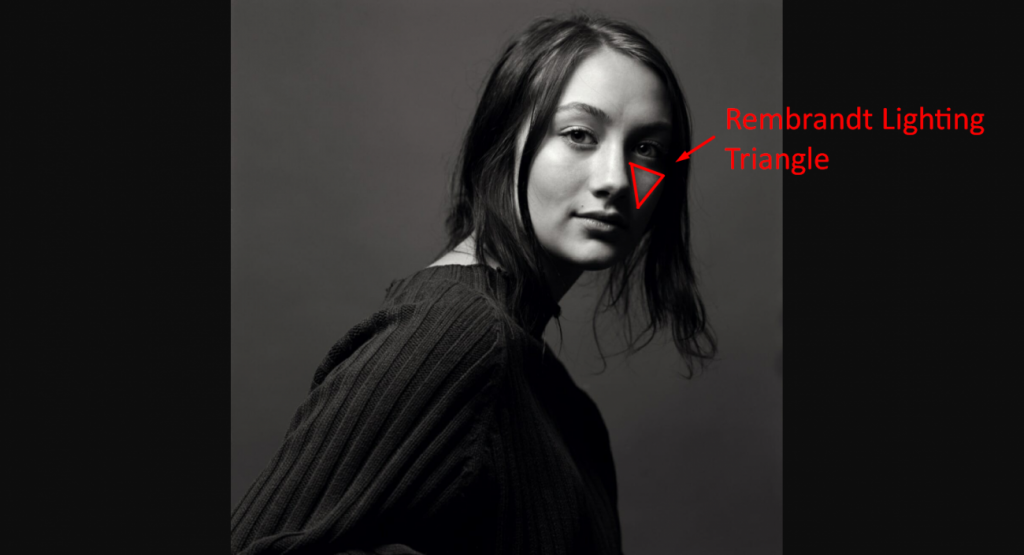
- Rembrandt lighting: Now, if we put the spotlight even further to the side, we will get the shadow of the nose to connect with the shadow of the cheek. This will generate a kind of triangle of light on the cheek of the shaded face. This pattern is one of the most used in Hollywood movies since it generates a very dramatic and cinematic perspective of the faces.
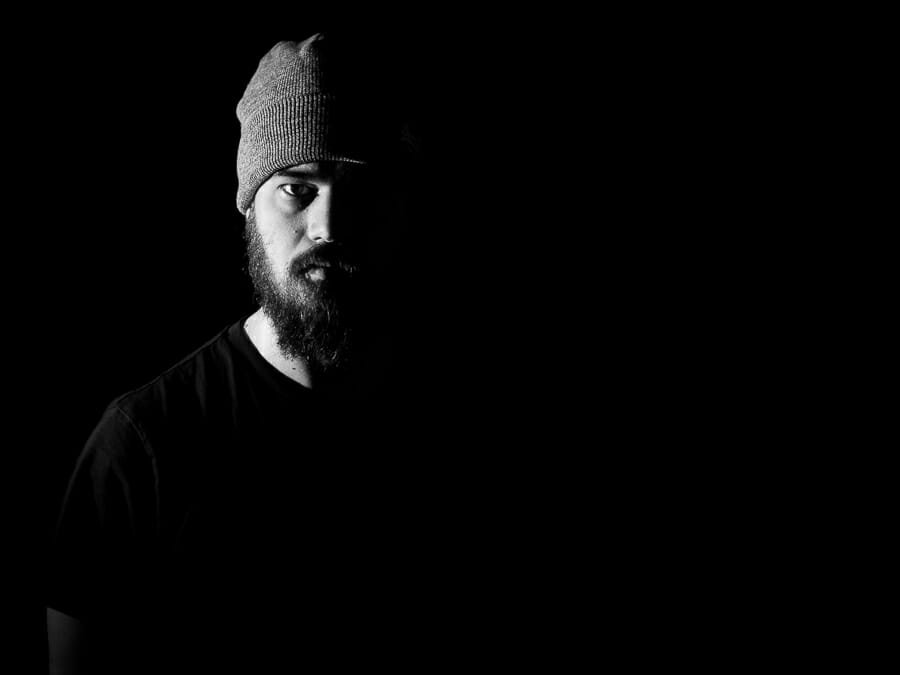
- Divided or Split Lighting: This is a pattern where the light falls directly on one of the sides of what we want to portray. It is a very strong style since it divides the image into two areas, one with much more visibility and the other shaded). This type of pattern is usually used when you want to mark features, but in this case masculine, giving a rougher appearance.
As you can see, many different scenarios can be created simply by changing the main focus position. Now it’s your turn to explore which style you like the most and the one that suits your needs.
Backlight
Also known as a backlight or hair light, this is a point of illumination that covers the entire back of our lens. Usually what you get is a halo effect around the object. This light, although it may seem that it does not do any type of work, is one of the keys for your projects to take a much more professional tone.
Photos can be taken with only a backlight, which generates a very contrasting halo appearance, or it can be combined with frontal light, to achieve much more enveloping spaces. As a tip, you do not urgently need a light bulb for your backlight, with some windows you can achieve similar effects, but less marked.
Fill light
This is a type of light that is responsible for removing drama from images. Generates less contrast between the front and rear lights. It is widely used especially in spaces such as commercials, where uniformity in light is sought. However, fill light does not necessarily imply reflecting direct light with a spotlight, simply a reflective canvas is enough to make the light much more enveloping.
¿Cómo tomar fotos utilizando un aro de luz?
Now, the rings of light are not as bulbs, but they can help you if we do not yet have the materials. They are a very good tool to give a different touch and with better quality to your photos, in addition to that, you can be much more creative and not only do you have white light but there are different colors with which you can create original photos.
Here are some examples and we explain how you should place your light points to get them:
- Before we reveal to you what kind of pattern is featured in this image of the mighty Keanu Reeves, we want you to first try to guess which pattern is being used for the lighting.
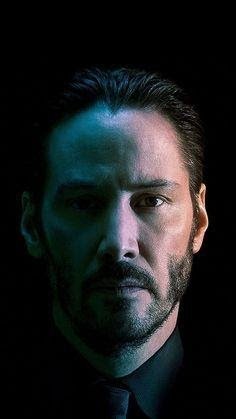
If you thought of split or split lighting, you are correct. To create it you will need two light bulbs. The key light should be aimed at the face directly on the side and precisely. On the other hand, we will have a fill light, which we will place in front of the face slightly elevated. In this case, you must bear in mind that this light must be enveloping, not so direct, that is why we recommend placing a bounce panel or a blanket that minimizes the harshness of the light. In the example, we can see the two points of light, the key light can be seen in the pupil and the surrounding light can be seen bouncing off the upper part of the forehead.
Another highlight in this photo is the colors, as you can see, for the key light a warm white light is used, while for the surrounding light a bluish greenish tone is used, much darker so as not to lose the Split effect.
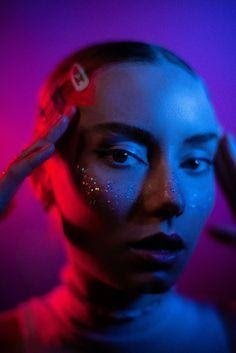
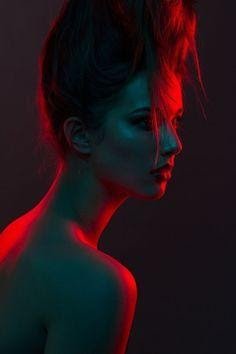
- These examples are perfect for you to see how you can use different colors, both keylight, and backlight. In the first image, we have a very pronounced backlight, contrasting with a greenish front light. In the other image, we also have a red tone of backlight, falling at some points on the model’s face, however, the front light contrasts a lot using bluish tones. In this case, the position of the lighting belongs to the loop effect, as can be seen by the shadows of the nose and the highlighting of the cheeks.
As a final example, we recommend that you watch the following video, where director Nacho Guzman highlights the power of lighting and colors to evoke different scenarios, without even changing the shot.